Our existing dining room table is a cheap little thing we got from Walmart after we had moved in to our apartment 3 years ago. Its been used and abused. Although I changed the seat fabric over a year ago, its just dingy looking. The screws that holds the seat to the chair are either loose or missing. The table has a layer of veneer that has areas where it has bubbled up tremendously from where the girls spilled something once and went unnoticed.Kayla uses it for homework, the girls for crafting, but mostly, it collects paperwork like mail and the girls millions of drawings and work they bring home from school. We did have actually have dinner on it last Thanksgiving!!
When we move, I'd like a "real" dining room table, sturdy, and not made of veneer. I am thinking of maybe using the one we have as a table for crafting up in my office. Maybe one day I'll refinish it somehow and sell it. I was thinking of making it, but I already have so many projects for this how I didn't want to add to this list. Thankfully, my mom had a extra table that she is going to sell me for cheap. But its old, scratched up, ugly, and just plain not me. So I spent most of this afternoon at my mom's garage working on this baby. I would actually be working on it some more right now, except after two gorgeous 65+ degree days, today has maxed out at 45 and cold and cloudy and windy. Not the best conditions for paint to dry.
But, I figured I may as well show you how its going so far. I am getting excited. I'm sorry I dont have better before pictures, we took it apart to bring it out of the house and into the garage. Since I am new to the whole blog thing, and this is my first makeover type post, I plumb forgot to take pictures before we took it apart. Here is the best I can do for before pics:
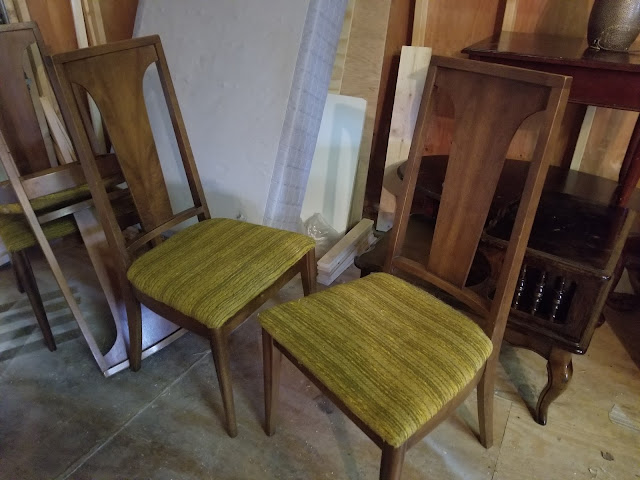 |
| The chair is a nice shape, but the picture does not do just to how bad the fabric is. The seat cushion is basically gone. |
 |
| Table legs, simple 4x4's |
 |
| But dinged/scratched up |
 |
| The table top. Not my color wood. I dont do honey/gold. |
 |
| Also very scratched up all over. |
I kept going back and forth on what colors to do, I really wanted white for the legs and tables but was really hesitant because the girls are monsters. But ultimately I decided that the girls wouldn't abuse this table as much as the other and I will be sealing it all with Polycrylic which should make it all much easier to clear. Here are a one of my inspiration pics that I found on Pinterest but can't find the source for. I love the white wash in that gray. But given that my walls will be painted light gray I dont want to overdo the gray.
I am maybe 25-50% finished. Partly due to the weather. I was going to come inside and work on the seats but 1) Somehow the mineral spirits bottle was leaking onto my fabric so I have to wash it again and 2) the foam square I bough for the seats are actually too small!! So I have to return the 4 pack of cushions and probably exchange it for a mattress topper instead. Some "during" pictures.

Dont they just look wonderful in white!!! Mind you, this is just the primer, sprayed with my trusty new Critter spray gun. My dad bought me a pancake compressor a few months back, and I ordered the Critter spray gun after hearing good things about it on the blog-o-sphere. It has awesome reviews on Amazon and is easy to use and clean. It was affordable, and while I bought it to use mainly on my kitchen cabinets when I finally work on them, I figured this would be a good opportunity to try it out. I love, LOVE that is uses mason jars, so instead of having to pour out and clean the container, I can just seal it for use at another time.
I swear this picture wasn't so blurry when I took it! LOL. This is the table while I was sanding it. I realized that I didn't have any stripper on hand, so I sanded it bare. That was a lot of sanding. A LOT. My arms hurt.
This is the table top after I round of a mix of stains of Jacobean, Dark Walnut, and maybe 25% dark gray , all Minwax stains. I am definitely going to go back and add another layer or two to make it darker, but it requires 4-6 hours in between coats of stain and its too late and too cold. I'll be back next weekend and hopefully the weather will cooperate!


 This is the table top after I round of a mix of stains of Jacobean, Dark Walnut, and maybe 25% dark gray , all Minwax stains. I am definitely going to go back and add another layer or two to make it darker, but it requires 4-6 hours in between coats of stain and its too late and too cold. I'll be back next weekend and hopefully the weather will cooperate!


Comments
Post a Comment